As John mentioned yesterday there are a few needle ideas we have in mind.
The first is coating a solid needle with an antigen layer which will dissolve and stay in the body. We have concerns about how exactly the layer would dissolve and how long it would take. This method is currently being researched in MIT to deliver DNA vaccines with microneedles.
Another idea is to have a hollow needle with the antigen in the needle. A water soluble polymer would block the hole to prevent leakage. Once the needle is inserted into the skin, the polymer would dissolve and the antigen liquid would leak out. We would have to choose a polymer that dissolves almost instantly when it reaches extracellular matrix in the body to have fast delivery of the antigen.
Another idea is having 2 layers in the microneedle pad. A top layer that contains the microneedles and a lower layer that contains pouches with the antigens. When the top of the device is clicked, the microneedles will lower to reach and pop the pouches and then pierce the skin. How do we know the liquid in the pouch actually reaches the inside of the body?
Another is a combination of the last two ideas. Having the pouches inside a primary hollow needle that has another needle inside the primary needle. When device is pushed and reached the body, the internal needle will pop the internal pouch and the hollow needle will direct where the antigen liquid goes. The concern would be how to manufacture the needles.
We are currently discussing the designs of the needles and how the manufacturing of each will maintain the cost reasonable.
Friday, March 28, 2014
Thursday, March 27, 2014
Design Review 3 Tasks
After class today, we had some good conversations with each other and with another classmate about how to approach our final design. Although we do need to improve on our design for the final report, our first prototype seemed to be pretty "works-like" with the spring mechanism for the stamp. The new additions for design review 3 that we need to work on include the FMEA for the device and the regulatory strategy. Since we began the FMEA analysis during class on Tuesday, that just needs to be completed and shouldn't take too long. As for the regulatory strategy, the FDA website (fda.gov) should have plenty of information on how to classify our device. Two devices I found that we could possibly use to help us classify our device include the Fluzone Intradermal, which is a flu vaccine delivered by a microneedle, and the DermaRoller, which is a roller containing many microneedles that get rolled onto the skin. We have also mentioned in previous posts the patents that are out there now for different kinds of research with microneedles as a drug delivery system. I think this is plenty of information to start us out with a regulatory strategy for our allergy testing product.
Pointers on Tips
At the end of class today, we got a chance to pull Ian aside. Ian had brought up some points about our microneedle device after design review 2, and we got him to give us some pointers on how to fabricate the allergen tips. For the most part, we've been considering our microneedles in terms of where they're going, into the dermis of the skin, and how the allergen is going to be delivered once they're there, either by hollow tubes, coated solid microneedles, or encapsulated tips. However, Ian raised a lot of red flag about what it actually takes to fabricate these microneedles. He is currently working on a senior project that works with microneedles and might even involve developing an applicator.
One problem he brought up was the flexing of the skin by a sort of bed-of-nails effect where the array sits on the skin, bending it slowly rather than puncturing quickly. We've talked about this before, and Ian wasn't even sure it would be a problem for our application. We should hash that out with real examples because his example of the Surgilance doesn't really fit our goals. Surgilance and Ian are both more interested in blood withdrawal rather than drug delivery.
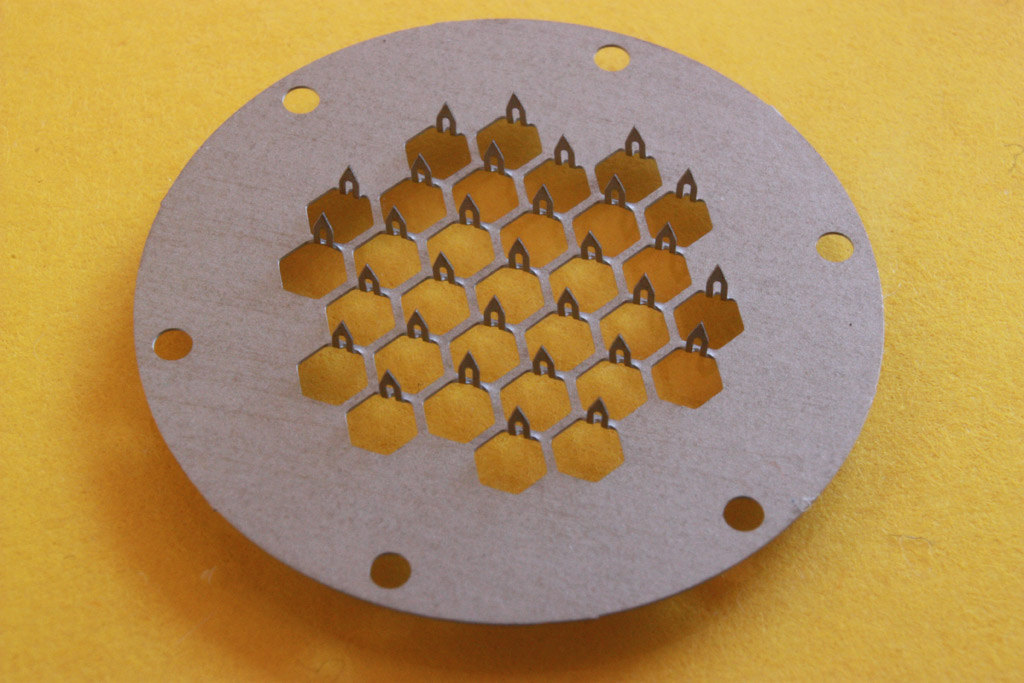
Another problem he brought up is fabrication. Based on available industrial methods, some of the more complex tips might be a pipe dream. He suggested a printed sheet where needles are bent up. This image gets the idea across. It's not the ideal picture were were thinking of, but it might end up being the more reasonable route. It asks important questions about our product. Are we making something that anticipates future manufacturing methods, or do we want something that'll be ready to go our the door with available methods? The latter makes a lot more sense for this class and the lessons we've learned from it. We're not just making a feasible laboratory device; we need a marketable product that at least theoretically attract investors.
One problem he brought up was the flexing of the skin by a sort of bed-of-nails effect where the array sits on the skin, bending it slowly rather than puncturing quickly. We've talked about this before, and Ian wasn't even sure it would be a problem for our application. We should hash that out with real examples because his example of the Surgilance doesn't really fit our goals. Surgilance and Ian are both more interested in blood withdrawal rather than drug delivery.
Another problem he brought up is fabrication. Based on available industrial methods, some of the more complex tips might be a pipe dream. He suggested a printed sheet where needles are bent up. This image gets the idea across. It's not the ideal picture were were thinking of, but it might end up being the more reasonable route. It asks important questions about our product. Are we making something that anticipates future manufacturing methods, or do we want something that'll be ready to go our the door with available methods? The latter makes a lot more sense for this class and the lessons we've learned from it. We're not just making a feasible laboratory device; we need a marketable product that at least theoretically attract investors.
Wednesday, March 26, 2014
In-class activity: Tracheotomy
Yesterday, we had our second prototyping session. Unlike last time, we were not given any material to start with. Instead, we were told to improvise a tracheotomy kit out of the items that we could find on us.
Here's the list of items that we found:
John: 2 pen caps
Natalia: A knife looking bookmark
David: A plastic straw from his bottle
Lauren: Hand sanitizer
Brian: Sharp ended floss and CD
Me: Manual and bag for the kit
(Sorry if i missed something)
With all these items, we came up with the following Tracheotomy kit:
Manual:
1) Apply hand sanitizer to sanitizer area
2) Break CD into half for sharp edges
3) Using broken CD, floss's sharp tip, and knife looking bookmark to cut open the skin and tissues until the trachea is reached
4) With the clip on the pen caps, clip open the cut on the neck to stabilize/ ply open the opening
5) When the trachea is reached, push in the straw to allow breathing of the patient
6) Apply hand sanitizer to disinfect area.
I personally think the kit turned out to be pretty well, and it was well explained by the other group members.
Saturday, March 22, 2014
A New Prototype?
Our current prototype utilizes a plunger that allows the user to apply the needle pad at an evenly distributed pressure of their choice. It may be the case that an alternate application method may be more appropriate. For instance, we received feedback from a classmate who has experience with microneedles that the needles should be injected quickly. If they are injected too slowly, the skin surface can bend, which he surmised would be a bad thing. One potential problem with the skin bending is that there may be a less even distribution of needles across the skin. Or perhaps the allergen would not be injected at the correct depth. Thus, we have considered spring-loaded designs that can "shoot" the needles into the skin. Such a mechanism could be initiated by a click at the top of the applicator or even at the bottom of the applicator as it comes into the surface of the skin. I have some rough sketches that I will post as soon as I can scan them. After further discussion and consideration, we may look to translate the sketches into CAD drawings and look to 3-d print.
Thursday, March 20, 2014
Weekly Update: Return from Spring Break
Over spring break, I had the chance to speak with another friend who really emphasized how much a less painful allergy test would benefit anyone who has to go through the testing. I know we were aiming toward a product to help children with allergy testing, but I think this we have a good chance of marketing this to all people who get allergy tests. She also explained how when she got tested, they first tested her for general categories of allergies to see what group of allergens she was allergic to. After that, they tested her for the specific allergens in that group. Maybe we could design different allergy pads with like 10 or 20 allergens that are in groups. That way, if the person is suspected to have a certain allergy, there can be specific pads for that allergen group. We could also still do an allergy pad with unrelated allergens, then go into the more specific allergen tests. This was just my thought for the week after talking to a patient who recently had the testing done. Obviously once the prototype design is complete and we can figure out the size of the matrix, we will know how many allergens each pad can contain. Only then can we look into this specification for our product.
I have also created a logo for our product. It's a work-in-progress, but does a pretty nice job making the bee look friendly, as opposed to hurtful :)

I have also created a logo for our product. It's a work-in-progress, but does a pretty nice job making the bee look friendly, as opposed to hurtful :)
Changing of our major focus of the project
We talked to Prof. Wong, and she suggested that we should focus on the reducing pain / standardizing the produce, rather than focusing too much on the diagnosis part of the project.
So, we decided to lower the number of allergens being tested by the device. Also, our primary contact told us that for most of the time, doctors already have an idea what type of allergens might be causing the allergic reaction, so they can just choose the specific allergens needed to perform the allergy testing.
Friday, March 7, 2014
Very Useful Paper for Microneedle Choices
This hyperlinked journal article is a review of microneedles for drug and vaccine delivery. I believe we've passed this around before, but I don't think we've featured it on the blog. There are certainly still lessons we can learn from it.
We can channel this primary information into our particular application. It talks about each choice of microneedle geometry, material, and drug delivery type. Some drug delivery devices are better suited for other applications. For example,fully dissolvable poly-saccharide subtrate microneedles are very effective for drug delivery in flu vaccine applications and limits biohazardous waste. However, that application requires a 10 minute set time in which the patch is constantly in contact with the arm. While this is fine for drug delivery, that 10 minutes of patch contact may disrupt the measurable outcome of the scratch test and render the assay useless. Those are the sorts of choices that we can propose and mark of the list. We have spoken in general and sometimes more specific terms about these choices and think we have an idea of what suits our project, but we should give this article rigorous consideration so that we may make the most appropriate choice. Perhaps there are recently developed geometries and subtrates that competitors neglected or weren't priviledge to. We have the advantage that the competitors that have approached this problem had to make final design choices earlier, where current research and manufacturing capacity could now be better suited.
Take a look at the paper! Future posts will have a more comprehensive analysis.
In case you missed the hyperlink: http://drugdelivery.chbe.gatech.edu/Papers/2012/Kim%20Adv%20Drug%20Deliv%20Rev%202012.pdf
Thursday, March 6, 2014
Design Review 2 Process and Feedback
After discussing our second design review, which included our prototype and visions for the final product, we came up with some useful feedback and potential issues. One thing we need to consider for the final design is the pressure used to apply the microneedles to the patient; we tried to address this problem by creating an applicator attachment to stabilize the device. We also designed a groove in the device so the plunger can only get pushed down to a certain distance. However, those do not standardize the amount of pressure a doctor uses to physically push the button down. We were also reminded that if we use microneedles, they have to be injected into the patient fast, in order to reduce the risk of the arm/skin bending before insertion. The next part of our design phase would have to focus on these issues and provide a solution that stays true to our original stamp design.
I have found two articles that address the issue with the force applied to microneedles for insertion into the skin. They can be found here and here. Both of these research articles discuss the force thresholds: a minimum force must be applied, but there is also a maximum force they can reach before breaking. This is something to consider if we do not use dissolvable or biodegradable microneedles. These are just some more quantitative angles we have to look at for our design and how we can get it to function properly.
I have found two articles that address the issue with the force applied to microneedles for insertion into the skin. They can be found here and here. Both of these research articles discuss the force thresholds: a minimum force must be applied, but there is also a maximum force they can reach before breaking. This is something to consider if we do not use dissolvable or biodegradable microneedles. These are just some more quantitative angles we have to look at for our design and how we can get it to function properly.
Sequence Drawings
How to set up our device:
.jpg) |
The stabilizer is screwed off to expose the pad holder and the pad is then attached.
|
.jpg) |
| The stabilizer is then reattached to the rest of the applicator and can be used. |
How to use our device:
 |
| The area where the allergy test will be done is cleaned. |
 |
| The applicator is placed on the area and the button on the top is pushed to inject the needles. |
 |
| The button is then released and the needles will rise off the skin. |
 |
| The applicator is removed from the skin and a matrix is left on skin to indicate where the needles were inserted. |
 |
| The stabilizer is once again removed |
 |
| The used pad is then removed into a biohazard container. |
Tuesday, March 4, 2014
CAD drawing
In the past few weeks, I've been learning SolidWorks and trying to come up with a model for the stamp. This is what I've come up with so far.


Subscribe to:
Comments (Atom)