Sunday, April 6, 2014

Close to Final Prototype Pictures

We have introduced two new improvements to our prototype for Design Review 3:

1) In the previous design reviews, our allergy stamp adopts a pressing mechanism. The doctor would place the allergy stamp onto the skin surface and then press down to apply the allergens. One of our classmate, Ian, had expressed a concern that the skin surface might bend in when the micro needles went down too slowly. We decided to adopt the pull and shoot mechanism, where the doctor would pull the micro needles and release to shoot them into the skin. The damping ratio as well as the spring constant must calibrated so that the spring would not bounce up and down on the skin.

2) Since the unused position of the inner plunger is in the downward position, so we also introduced a bottom cover so that the stamp can stay clean when not used.


Pictures for prototype:

all.JPGIMG_1784.jpgIMG_1788.jpg

Friday, April 4, 2014

How to Read Our Allergy Test

A common question we have gotten over the past three design reviews was some variation of "How do you read the test results?". Normally, allergy tests produce small bumps on the arm called wheals and each allergen has a control bump (if there is a reaction or not) that is about 2-3mm in diameter. A positive reaction would then have a wheal size of up to 5 mm in diameter on average. The wheals can easily be seen by the eye and these sizes are measured using calipers. In our device, however, the needles are much smaller and we are scaling down the dosage of the allergens. Through research, we have found out that this change would only scale down the size of the reaction. For example, instead of a 2-3 mm control size, it might be 0.2-0.3mm (if scaled down by a factor of 10, for example). Then the reaction size might only be about 0.5 mm, which is very small. We proposed using the same caliper measuring method, but adding in a magnifying glass, so the wheals can be seen better. Many people were also skeptical about this method if we were to have a large amount of allergens in our matrix (between 10 and 40, for example).

However, after discussing with Professor Wong about this issue, she explained that the main purpose of our device is to reduce the pain of having an allergy test. Although it is important to have to read the results, we should focus on the device and how the microneedles reduce pain, not necessarily on the reading of the results. If our only design goal was to reduce the pain of having an allergy test, then all we would have to do is show that we could get the microneedles to administer a test with less pain. Therefore, we could include only 2 allergens (2 microneedle clusters on the array) just to make our point. She also mentioned how the reading of the test could also be considered a project of its own and we should just prove the pain-free administration of the test.

Therefore, I think that it is best if we just focus on making the physical/mechanical aspects of the device work and then state that by magnifying the test area, the results can be read. I also think we should address the matrix size/allergen location confusion by creating a "legend" with the microneedle arrays. I think we should have something similar to what is on a box of chocolates to say which type of chocolate is where: just a map that can be used to match the allergens to their location. In order to do this, I think we need to make the matrix not a square so the legend can still be helpful for any orientation of the array.

These are just some of the ideas I had for this one comment we seem to keep getting after design reviews and we can consider them for the final product and presentation.

Questions and Feedback from the Presentation

We got good responses about our device after the presentation.

One of the questions is how do we ensure that all the needles are coated with the allergens. Earlier in our brainstorming sessions we were considering adding a colored dye to the allergens solvent to see the allergens on the needles. However, if the patient is allergic to dyes, all the tests would be positives and there would not be a conclusive result. We could use a fluorescent dyes when we are testing and manufacturing the needles to show that the needles are coated and determine the percentage of the needles that end up being coated.

Another concern of the project is how to determine if the patient is allergic to the allergen or not and how to view the result. The device we are designing is mostly focused on the fast administering of the allergen and not really how to read the results. For now we are considering having the doctor observe the reaction through a magnifying glass and deciding if the patient is allergic or not. However, we don't know if reducing the dosage will make the diagnosing the allergy a yes or no reaction (if there is a reaction there is an allergy vs there is no reaction therefore there isn't an allergy).

For the moment, we are waiting for the results from the survey.

Friday, March 28, 2014

Needles and Antigen Delivery

As John mentioned yesterday there are a few needle ideas we have in mind.

The first is coating a solid needle with an antigen layer which will dissolve and stay in the body. We have concerns about how exactly the layer would dissolve and how long it would take. This method is currently being researched in MIT to deliver DNA vaccines with microneedles.

Another idea is to have a hollow needle with the antigen in the needle. A water soluble polymer would block the hole to prevent leakage. Once the needle is inserted into the skin, the polymer would dissolve and the antigen liquid would leak out. We would have to choose a polymer that dissolves almost instantly when it reaches extracellular matrix in the body to have fast delivery of the antigen.

Another idea is having 2 layers in the microneedle pad. A top layer that contains the microneedles and a lower layer that contains pouches with the antigens. When the top of the device is clicked, the microneedles will lower to reach and pop the pouches and then pierce the skin. How do we know the liquid in the pouch actually reaches the inside of the body?

Another is a combination of the last two ideas. Having the pouches inside a primary hollow needle that has another needle inside the primary needle. When device is pushed and reached the body, the internal needle will pop the internal pouch and the hollow needle will direct where the antigen liquid goes. The concern would be how to manufacture the needles.

We are currently discussing the designs of the needles and how the manufacturing of each will maintain the cost reasonable.

Thursday, March 27, 2014

Design Review 3 Tasks

After class today, we had some good conversations with each other and with another classmate about how to approach our final design. Although we do need to improve on our design for the final report, our first prototype seemed to be pretty "works-like" with the spring mechanism for the stamp. The new additions for design review 3 that we need to work on include the FMEA for the device and the regulatory strategy. Since we began the FMEA analysis during class on Tuesday, that just needs to be completed and shouldn't take too long. As for the regulatory strategy, the FDA website (fda.gov) should have plenty of information on how to classify our device. Two devices I found that we could possibly use to help us classify our device include the Fluzone Intradermal, which is a flu vaccine delivered by a microneedle, and the DermaRoller, which is a roller containing many microneedles that get rolled onto the skin. We have also mentioned in previous posts the patents that are out there now for different kinds of research with microneedles as a drug delivery system. I think this is plenty of information to start us out with a regulatory strategy for our allergy testing product.

Pointers on Tips

At the end of class today, we got a chance to pull Ian aside. Ian had brought up some points about our microneedle device after design review 2, and we got him to give us some pointers on how to fabricate the allergen tips. For the most part, we've been considering our microneedles in terms of where they're going, into the dermis of the skin, and how the allergen is going to be delivered once they're there, either by hollow tubes, coated solid microneedles, or encapsulated tips. However, Ian raised a lot of red flag about what it actually takes to fabricate these microneedles. He is currently working on a senior project that works with microneedles and might even involve developing an applicator.

One problem he brought up was the flexing of the skin by a sort of bed-of-nails effect where the array sits on the skin, bending it slowly rather than puncturing quickly. We've talked about this before, and Ian wasn't even sure it would be a problem for our application. We should hash that out with real examples because his example of the Surgilance doesn't really fit our goals. Surgilance and Ian are both more interested in blood withdrawal rather than drug delivery.

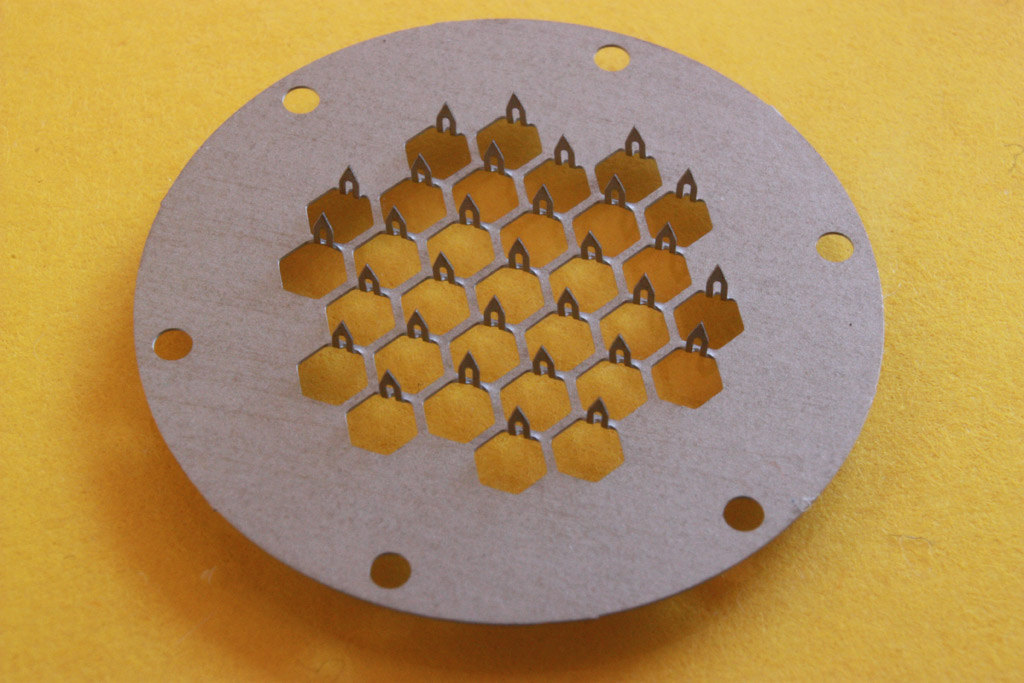
Another problem he brought up is fabrication. Based on available industrial methods, some of the more complex tips might be a pipe dream. He suggested a printed sheet where needles are bent up. This image gets the idea across. It's not the ideal picture were were thinking of, but it might end up being the more reasonable route. It asks important questions about our product. Are we making something that anticipates future manufacturing methods, or do we want something that'll be ready to go our the door with available methods? The latter makes a lot more sense for this class and the lessons we've learned from it. We're  not just making a feasible laboratory device; we need a marketable product that at least theoretically attract investors.


Wednesday, March 26, 2014

In-class activity: Tracheotomy

Yesterday, we had our second prototyping session. Unlike last time, we were not given any material to start with. Instead, we were told to improvise a tracheotomy kit out of the items that we could find on us.

Here's the list of items that we found:

John: 2 pen caps
Natalia: A knife looking bookmark
David: A plastic straw from his bottle
Lauren: Hand sanitizer
Brian: Sharp ended floss and CD
Me: Manual and bag for the kit
(Sorry if i missed something)

With all these items, we came up with the following Tracheotomy kit:

Manual:
1) Apply hand sanitizer to sanitizer area
2) Break CD into half for sharp edges
3) Using broken CD, floss's sharp tip, and knife looking bookmark to cut open the skin and tissues until the trachea is reached
4) With the clip on the pen caps, clip open the cut on the neck to stabilize/ ply open the opening
5) When the trachea is reached, push in the straw to allow breathing of the patient
6) Apply hand sanitizer to disinfect area.

I personally think the kit turned out to be pretty well, and it was well explained by the other group members.